Saturday, July 25, 2009

Aquila Wreckage

Wow! It feels like forever! Well, alright, not quite forever but it's been a while. Definitely longer than I intended or would like. In theory I'm doing this every day or every other day. However, this has been a few days from heck so you get back to things when you can.

My accomplishment has been a small one. I took seven Macragge Aquila terrain pieces and drybrushed the ever loving crap out of them white. Two of them are left over from an old set of then I had. The rest I acquired a couple of years ago. I'll probably paint the two older ones to match the other ones I have in black and green. The newer ones though, I'm thinking about doing them in a much lighter scheme. In fact, I'm thinking about painting them white with light blue detailing. That might look really neat. As for the ground they're crashed in, I've decided to paint it up in desert colors to go along with my goal of having a more robust desert set.

Once again, the goal is not to accomplish a lot. It's to do a little bit each day. And finally, after a bad few days, I'm back on track.

Tuesday, July 21, 2009

A Tale In The Desert, A War In The Sun

It's been a long weekend filled with mostly fun, childcare and thought. Now that I have tables, it's time for me to seriously think about what kind of game setup I want to have. Certain things are a given but certain things have required some decision on my part.

First, one of my projects over the next few months will be to start acquiring 2x2' birch boards from a home improvement store. I will probably acquire them from Lowe's. The one that rhymes with "Dome Creep-o"...well, I have a few problems with the opinions and political biases of their owner so I vote with my dollar and spend them elsewhere. I don't know if Lowe's owner is any better, but he/they are smart enough to keep his/their mouths shut about it. That and Lowe's definitely has boards in stock because that's where I saw them and got the idea. I'm planning on buying six to start with (I think the birch ones were $6 each) so I can start with a 4x6" area to play on (just like the GW Battleboard set) and then picking up three more each month so I can have larger fields to play on.

Second, I've decided that I want to have a robust set of desert themed terrain. More specifically, I'd like to be able to have a large fortress or small city much like the one pictured above or possible the long walled outskirts of a desert town. Adding the short walls I just made to the ones I have brings me up to twelve and a simple gatehouse. I have a few small buildings but only one good tower to form corner defenses and interior structures. So I need to make a few small buildings and a bunch of towers. I figure five of each would be a good start. Ruins won't be an issue since I have more than a good handful of those.

Third, I need to make some non-city terrain for this. Palm tree groves and oases and wells would be the ticket. Palm trees are relatively easy. I've already found some kid toy sets that have palm trees so I can give the animals away (mine is too young for a while) and keep the trees to make stands of them. A few trees and some green stuff with a bit of water effect will make an oasis. If I find some kind of single brick set, I could make a well, I guess. Heck, I could probably make the bricks out of some kind of cheap modeling clay or something similar. Some more water effects and a frame of some kind and it could look pretty good.

So that's the beginning of the plan. Now let's see what I can get done to step closer to accomplishing it.

Friday, July 17, 2009

We Interrupt Your Regularly Scheduled Crafting...

...for news of a beautiful and wonderful nature. Yesterday, someone in the building I work at was having some junk carted off. I noticed while passing by that a couple of old folding tables were in the junk. He told me that I could have them if I carted them off immediately. So I pulled the car around and managed to get them in the trunk (half sticking out of the back, of course) and ran them home at lunch. Aren't they beautiful? And just the right price, too. :) As the man once said, "Cheap is good, but free is better"! Of course, this also means that I have to get serious about sorting and arranging the game room now.

Doesn't that look like a lovely place to have a battle? Lots of terrain to hide behind and move through? Good fire lanes in the streets (in as much as open lanes of grass can be streets)? It looks lovely! Did I mention that I made every piece of terrain on the table? And this also means that I can begin Operation "Emulate Battleboard" in earnest soon. Time to start considering what shades of green, gray and tan I want to start using for the project.

Thursday, July 16, 2009

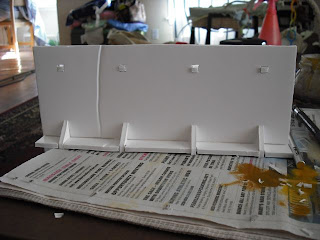
The Last Wall For a While

Before you is the last short wall I intend to make for a while. Just for the sake of full disclosure, if you look in the background, you can see the wall I completed before but recycled a picture for. Soon, I'm going to paint the five walls I've recently completed but I haven't decided if I want to do them all in tan and continue my desert/adobe theme of if I should do them in gray and make them part of my industrial buildings. I'm leaning towards desert because industrial areas tend to have open areas and more wide-ranging and mechanized defenses while out in the desert, walls are more useful for shade and against the occasional in coming invader or some kind of crap like that. In addition, I like the desert look a little more so I am leaning in that direction. I noticed a while back that if you put two of these walls back to back, they make a good elevated pathway. I noticed this morning that, thanks to the notches I put in the base so that they could stand at angles, I can fit a building to them well so I'm thinking that a few of these walls together like that and a few buildings together could make a pretty cool Indomitable Fortress.

Started drawing out that Memorial column I was talking about before. I have a couple of small issues to work out, but I see great potential for it as a terrain piece. On a completely different note, I'm also thinking about making more static defenses like sandbag walls, concertina wire and tank traps. The sandbag walls, well, there are ways to make them from scratch but I like the Tamiya ones a lot and they're cheap ($5/box) and they look good. One box can make an inch high tank redoubt or four five in ch long sandbag walls. If you pick up one a month, after a while you'll be swimming in sandbag fortifications. As for concertina wire and tank traps, they may be the subject of a future entry...

Haven't decided what to do next. You'll probably know the day after I do. I've got several things to paint and I think I'll do a bit of that for a while. Besides, I don't want to go out and buy any foamcore right now. I'll have to soon enough when I'm ready to build the Memorial column.

Wednesday, July 15, 2009

Wall

What did I get done last night? I assembled another wall. Actually, I also painted a couple of miniature ships for another game system entirely but we're concerning ourselves with 40K here so that other stuff doesn't matter. I also have to ask your forgiveness for the photograph. I took a picture of the wall I made last night, but I don't have it on hand for this and since one wall looks remarkably like another wall, I decided to recycle a wall pic. Consider me properly castigated. I'll never do it again. :)

I'm thinking about a quick little project. I was reading an article from some women's magazine about interesting lighthouses and the shape of one caught my eye. It was something easy to do with foamcore and I envisioned it more as the base and column of some kind of memorial or statue. Recently I made a memorial out of a Black Reach Captain (I've got 3 or 4 I'll never use for play), a dice box (you know the ones that dice bricks come in) and some Basilica buttresses all mounted on a CD (good use for coasters). Well, a CD is just a bit smaller than 5x5" (120mm or 4.72") so if I made this base column that's based on this lighthouse, it'll be just the right size to top with this statue. It's also a good reason to make more statues (besides the fact that more and varied terrain is always good).

As a side mention to the foamcore design tutorial and because this entry made me think of it, here's something to think about. Of course you need graph paper to design your buildings. Well, you don't NEED it, but it helps a lot. But 8.5x11" graph paper isn't suited for bigger things which you'll probably eventually want to make. You could make lots of smaller pieces and put them together to make something bigger, but sometimes you want a big facade for a building or something similar. Trust me. Those city walls? The factory? I didn't do them on normal sized sheets. Go out to an art supply store (or, in my case, local blueprint company) and you'll find graph paper pads that are 11x17". They're obviously a little more expensive, but when you want to do something big, they can't be beat. If you're going to make a lot of buildings, it's a good investment if and/or when you decide to go bigger.

Monday, July 13, 2009

Some Things I've Done With Foamcore

So, I've been talking about all this stuff you can build with foam core. Well, it's time to show you some of the things I've done. Maybe you'll get inspired!

Desert buildings. Note the one at the far right front. That's basically the basic building we built last time with the bottom of a plastic easter egg on top.


Similar buildings with an industrial look. The little factory in front is just foamcore with a couple of short PVC pipe fittings.


Desert ruins... Note that their bases are L-shaped. That way I can fit them together to make bigger building footprints...


Of course, wall rubble makes great barricades and can represent even more demolished buildings.


Talking about Planetstrike, does that look like it could be a Skyshield landing pad to you? It's a whole lot cheaper...


And maybe those could be defensive walls around a bunker. How many foamcore defensive lines do you think you can get out of $20 worth of foamcore?


These are bridges. Some are meant as river crossing bridges. The rear ones were meant to be between buildings but several strung together make a great elevated monorail track.


Watch out for the scraps you cut out while making something. These were left over from the monorails. I slapped them on a base and now they're Imperial message boards. Some people like the Imperium and some people don't...


Now these are city walls! Constantinople had nothing on these bad boys!


But if you need something for a small fort or a compound, these'll work nicely, too.


This is one of my biggest pieces. This factory has a 15x15" footprint. It's foamcore with some plasticard on the doors and PVC pipes for tubes and smokestacks.


And lastly, you've seen these before. Who says you're restricted to blocky Imperial architecture?


So, I hope you got some ideas from this. when it comes to foamcore, you're pretty much limited by the thickness of the foamcore and your imagination (and maybe the size of your graph paper but you can buy that bigger!) so get out your pencils. Get drawing, get gluing and get cutting!

Saturday, July 11, 2009

Wall & Foamcore Tutorial 3

What did I make? Another wall! What are the odds? Actually, I have a couple more to build so don't be amazed when I present them in the next few days. But, then again, that's not all I did. I also continued with the foamcore tutorial.

Yesterday I drew a simple building on graph paper. Normally I would have made photocopies of it but for our purposes today, I'm going to use the original drawn template itself. First you need your tools: a glue stick, a bottle of glue and an exacto knife. Once you have those out, we're ready to begin.
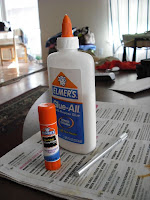
Take your glue stick and run it on the back of the template so you can stick it to the foamcore. If you want to be hardcore about it, a couple of days before you use it, open the glue stick and let it dry out. The glue in there is moist and when you put it on the paper, it will absorb into and warp the paper a bit. If you leave the glue stick open, excess moisture will evaporate giving you less chance of that happening. That's also why you want to photocopy the template. Copy paper is less absorbent than graph paper so you won't have to worry about it as much.
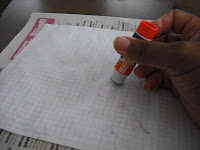
Adhere the glued template to the foamcore. Make sure it's flat and as even as possible. Notice how my sticking has ripples in it? That's because of moisture warping the graph paper as I mentioned before. Try to do the best you can but don't stress if there's a bubble or anything like that. Unless you're doing precision cuts or something like that, it won't really matter too much for out purposes.
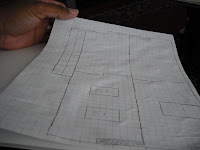
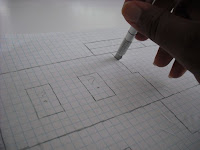
This is when you get out the exacto knife and start cutting. Once again, try to stay with your lines the best you can, but don't stress if it isn't perfect. Foamcore is light enough and strong enough that even if you don't make a perfect line, the edges can still adhere well to things when gluing. Another thing that I'd take the time to mention is that if you plan on building a lot of buildings or big ones, you might consider buying a mat cutter. Even an inexpensive one will help with your straight lines and allow you to cut through board at angles if you want. If I had to start building again from the beginning, knowing what I know now, I would definitely invest in one. I also chose to cut out the door and windows. I recommend taking a little bit of scrap foamcore and gluing it behind the open sections. once you've finished and are ready, it's a little hard to paint the inside of the building. Besides, why waste the paint?
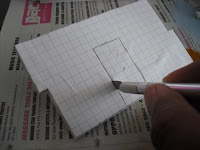
Once you've done the cutting, you'll be left with the various parts. Peel off the paper. A little might stick, but that's OK. it'll get painted over in the end so it won't hurt anything. It's a good time to double check and make sure everything is the proper size. I'll tell you a secret. When I drew this out, I miscounted one of the sides and made it a hair too long. It was an easy fix, but it's a perfect reason why you don't want to use your originals. If I still had it, I could erase and redraw a couple of lines and if would have been perfect for reproduction.

Note how these two building sides join together? That way, when I glue them, they'll be more stable since I''ll glue each join in two different places instead of one that could just snap. When I make taller buildings, I'll continue that up the side so they all fit together like teeth. Lots of extra stability makes for more durability...

Start gluing the joins and also the walls to the base. Usually if you glue two walls together and then to the base, it's easier to glue the other walls on. You may have to hold pieces in place for a minute but it should go together easily. And don't forget to glue the scrap foamcore to the door and windows! Glue the supports in the corners for the roof. They hold up the roof and, if you glue on three sides, give extra stability to the structure as a whole.
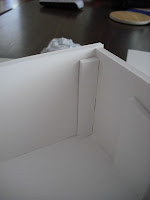
Make sure you finish everything you're going to do inside because now it's time to glue on the roof. Once you've done that, there's not getting back in there without doing some cutting. However, since it's just foamcore, if you make a mistake, turn it into a ruin or something and build another correctly. That's the great thing about foamcore buildings. if you mess them up, who cares? Make another!
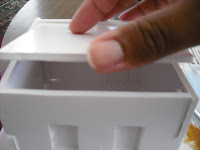
Lastly, glue on the roof. It only takes a little bit on each support and letting it settle.
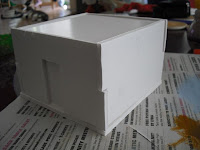
Voila! You new have a completed building. You may want to embellish it a little. A Plasticard logo could be cool. I like to take the bottom halves of plastic easter eggs and glue them on top for domes. Some bits glued on could make this a communication center or a temple or storage depot or whatever else you want. And of course, you can make buildings of almost any size and shape fore just about any function. Or you can go smaller, making barricades, bunkers and anything else you can think of. Heck, I'm even working out how to make vehicles and Rhinos out of foamcore so I can make wrecked vehicles for more terrain. The possibilities are almost endless. In fact, tomorrow, I'm going to show you some of the things I've made so you can see for yourself and maybe get some ideas.

Until then, good luck and good cutting!