Thursday, July 30, 2009

Walls & Building

Alright, I did the back sides of the walls last night. Now all I need is a little touch up, especially in corners, and they'll be good to go. While I was at it, I painted the building from the foamcore tutorial last night. Once again, I need to black in the windows and door and it'll be done.

Not too much to report other than that. I've been thinking about a terrain piece using a couple of those slimfast cans I acquired a number of years ago and still haven't used. They would be another addition to my one-day-to-be-accomplished industrial tank farm that I've been considering for years. Of course, this is just a side project that I don't feel pressure on since it's been rattling around for about 5 years and I've only built one piece... That doesn't mean I shouldn't pick up a few more small coffee cans, just in case.

Wednesday, July 29, 2009

Half-Painted Walls

Well, I'm halfway to my previously stated short term goal for the week. Last night I whipped out a bottle of paint and a foam brush and painted the front sides of those five walls of mine. Now they taunt me less with their reflective whiteness. Tonight I hope to get to the back sides of them and maybe do another once over on the fronts. The foam brush covers quickly and well, but you have to wait for paint to completely dry before you can go over it again or it streaks badly or, even worse, wears off and leaves big white sections showing through. Hopefully, by the weekend, I'll have these done and will have started the bastions.

I've run into a minor pickle. You see, I have another painting project I'm doing for a friend of mine. It's not 40K related but it's something I want to focus on and devote time to. Basically, I'm not sure whether I should put the work in progress here or not. Give me a couple of days to think about it.

I think when I've made my desert bastions and acquired and painted boards, I'm going to to arrange a battle with friends at my house. The entire point of building all this terrain and table acquisition is to be able to play more battles at home. I've always wanted to but I've never really had the space to do so. Now I do but it's space that's...environmentally challenged in that it's too hot in the summer and too cold in the winter to really use. I may have to plan a day in the fall that's good enough but considering the weather here in fall, that'll still be rough and too hot. But darn-it-all, I want to play in my own home and I will come hell or high water!

Tuesday, July 28, 2009

More Aquila Wreckage

Technically, it's the same wreckage since this is one of the pieces from a few days ago. I decided that I wanted to go ahead with that alternate color scheme I has mentioned. I quite like it. Unfortunately, the picture is kinda dark so you can't see the desert (for lack of a better term) sands around it too well. That and it's a little darker than I had hoped but that's just because I quit keeping bad moon yellow on hand a number of years ago and went to golden yellow exclusively. Heck, to get this light a sand color I had to layer and drybrush quite a bit (snakebite leather, yellow, bleached bone, yellow, white, yellow). Of course, I'm reminded that GW actually has a desert "yellow"(that is really more of a brown). Maybe, at some point when I have disposable income again, I might pick some up. I'm also thinking that this piece would look a bit cooler with some weathering. I may check out some sites and get some weathering ideas. If I don't, well, it could be just recently crashed. And I must admit that I like this look much better than the DA green, black and boltgun metal of my old pieces.

Short term goal for the week: I want to paint those walls I made a couple of weeks ago. They're just sitting in all their reflective white glory, shaming me into guilt. Might as well paint that building I made for the foamcore tutorial while I'm at it.

Long term goal for the coming month: I'm going to start making more foamcore two story buildings for desert terrain. A two story building makes a decent cheap bastion and I've got tons of ruins already for when any gets destroyed. I intend to have 5 done by mid-month (which isn't an outrageous plan since I could make that over a weekend if I had some time and minimal distractions.

Of course, all goals are subject to change, whim and the general availibility of time and whatnot.

Final thought: I have yet to play a Planetstrike game. I haven't been able to go to the local game stores (Austin's two best game stores are both within five minutes drive) and my normal group is on a bit of a seasonal 40K downswing. We play a lot for a while, then real life gets in the way and we don't play so much, wash, rinse, repeat. But soon, I hope...

Saturday, July 25, 2009

Aquila Wreckage

Wow! It feels like forever! Well, alright, not quite forever but it's been a while. Definitely longer than I intended or would like. In theory I'm doing this every day or every other day. However, this has been a few days from heck so you get back to things when you can.

My accomplishment has been a small one. I took seven Macragge Aquila terrain pieces and drybrushed the ever loving crap out of them white. Two of them are left over from an old set of then I had. The rest I acquired a couple of years ago. I'll probably paint the two older ones to match the other ones I have in black and green. The newer ones though, I'm thinking about doing them in a much lighter scheme. In fact, I'm thinking about painting them white with light blue detailing. That might look really neat. As for the ground they're crashed in, I've decided to paint it up in desert colors to go along with my goal of having a more robust desert set.

Once again, the goal is not to accomplish a lot. It's to do a little bit each day. And finally, after a bad few days, I'm back on track.

Tuesday, July 21, 2009

A Tale In The Desert, A War In The Sun

It's been a long weekend filled with mostly fun, childcare and thought. Now that I have tables, it's time for me to seriously think about what kind of game setup I want to have. Certain things are a given but certain things have required some decision on my part.

First, one of my projects over the next few months will be to start acquiring 2x2' birch boards from a home improvement store. I will probably acquire them from Lowe's. The one that rhymes with "Dome Creep-o"...well, I have a few problems with the opinions and political biases of their owner so I vote with my dollar and spend them elsewhere. I don't know if Lowe's owner is any better, but he/they are smart enough to keep his/their mouths shut about it. That and Lowe's definitely has boards in stock because that's where I saw them and got the idea. I'm planning on buying six to start with (I think the birch ones were $6 each) so I can start with a 4x6" area to play on (just like the GW Battleboard set) and then picking up three more each month so I can have larger fields to play on.

Second, I've decided that I want to have a robust set of desert themed terrain. More specifically, I'd like to be able to have a large fortress or small city much like the one pictured above or possible the long walled outskirts of a desert town. Adding the short walls I just made to the ones I have brings me up to twelve and a simple gatehouse. I have a few small buildings but only one good tower to form corner defenses and interior structures. So I need to make a few small buildings and a bunch of towers. I figure five of each would be a good start. Ruins won't be an issue since I have more than a good handful of those.

Third, I need to make some non-city terrain for this. Palm tree groves and oases and wells would be the ticket. Palm trees are relatively easy. I've already found some kid toy sets that have palm trees so I can give the animals away (mine is too young for a while) and keep the trees to make stands of them. A few trees and some green stuff with a bit of water effect will make an oasis. If I find some kind of single brick set, I could make a well, I guess. Heck, I could probably make the bricks out of some kind of cheap modeling clay or something similar. Some more water effects and a frame of some kind and it could look pretty good.

So that's the beginning of the plan. Now let's see what I can get done to step closer to accomplishing it.

Friday, July 17, 2009

We Interrupt Your Regularly Scheduled Crafting...

...for news of a beautiful and wonderful nature. Yesterday, someone in the building I work at was having some junk carted off. I noticed while passing by that a couple of old folding tables were in the junk. He told me that I could have them if I carted them off immediately. So I pulled the car around and managed to get them in the trunk (half sticking out of the back, of course) and ran them home at lunch. Aren't they beautiful? And just the right price, too. :) As the man once said, "Cheap is good, but free is better"! Of course, this also means that I have to get serious about sorting and arranging the game room now.

Doesn't that look like a lovely place to have a battle? Lots of terrain to hide behind and move through? Good fire lanes in the streets (in as much as open lanes of grass can be streets)? It looks lovely! Did I mention that I made every piece of terrain on the table? And this also means that I can begin Operation "Emulate Battleboard" in earnest soon. Time to start considering what shades of green, gray and tan I want to start using for the project.

Thursday, July 16, 2009

The Last Wall For a While

Before you is the last short wall I intend to make for a while. Just for the sake of full disclosure, if you look in the background, you can see the wall I completed before but recycled a picture for. Soon, I'm going to paint the five walls I've recently completed but I haven't decided if I want to do them all in tan and continue my desert/adobe theme of if I should do them in gray and make them part of my industrial buildings. I'm leaning towards desert because industrial areas tend to have open areas and more wide-ranging and mechanized defenses while out in the desert, walls are more useful for shade and against the occasional in coming invader or some kind of crap like that. In addition, I like the desert look a little more so I am leaning in that direction. I noticed a while back that if you put two of these walls back to back, they make a good elevated pathway. I noticed this morning that, thanks to the notches I put in the base so that they could stand at angles, I can fit a building to them well so I'm thinking that a few of these walls together like that and a few buildings together could make a pretty cool Indomitable Fortress.

Started drawing out that Memorial column I was talking about before. I have a couple of small issues to work out, but I see great potential for it as a terrain piece. On a completely different note, I'm also thinking about making more static defenses like sandbag walls, concertina wire and tank traps. The sandbag walls, well, there are ways to make them from scratch but I like the Tamiya ones a lot and they're cheap ($5/box) and they look good. One box can make an inch high tank redoubt or four five in ch long sandbag walls. If you pick up one a month, after a while you'll be swimming in sandbag fortifications. As for concertina wire and tank traps, they may be the subject of a future entry...

Haven't decided what to do next. You'll probably know the day after I do. I've got several things to paint and I think I'll do a bit of that for a while. Besides, I don't want to go out and buy any foamcore right now. I'll have to soon enough when I'm ready to build the Memorial column.

Wednesday, July 15, 2009

Wall

What did I get done last night? I assembled another wall. Actually, I also painted a couple of miniature ships for another game system entirely but we're concerning ourselves with 40K here so that other stuff doesn't matter. I also have to ask your forgiveness for the photograph. I took a picture of the wall I made last night, but I don't have it on hand for this and since one wall looks remarkably like another wall, I decided to recycle a wall pic. Consider me properly castigated. I'll never do it again. :)

I'm thinking about a quick little project. I was reading an article from some women's magazine about interesting lighthouses and the shape of one caught my eye. It was something easy to do with foamcore and I envisioned it more as the base and column of some kind of memorial or statue. Recently I made a memorial out of a Black Reach Captain (I've got 3 or 4 I'll never use for play), a dice box (you know the ones that dice bricks come in) and some Basilica buttresses all mounted on a CD (good use for coasters). Well, a CD is just a bit smaller than 5x5" (120mm or 4.72") so if I made this base column that's based on this lighthouse, it'll be just the right size to top with this statue. It's also a good reason to make more statues (besides the fact that more and varied terrain is always good).

As a side mention to the foamcore design tutorial and because this entry made me think of it, here's something to think about. Of course you need graph paper to design your buildings. Well, you don't NEED it, but it helps a lot. But 8.5x11" graph paper isn't suited for bigger things which you'll probably eventually want to make. You could make lots of smaller pieces and put them together to make something bigger, but sometimes you want a big facade for a building or something similar. Trust me. Those city walls? The factory? I didn't do them on normal sized sheets. Go out to an art supply store (or, in my case, local blueprint company) and you'll find graph paper pads that are 11x17". They're obviously a little more expensive, but when you want to do something big, they can't be beat. If you're going to make a lot of buildings, it's a good investment if and/or when you decide to go bigger.

Monday, July 13, 2009

Some Things I've Done With Foamcore

So, I've been talking about all this stuff you can build with foam core. Well, it's time to show you some of the things I've done. Maybe you'll get inspired!

Desert buildings. Note the one at the far right front. That's basically the basic building we built last time with the bottom of a plastic easter egg on top.


Similar buildings with an industrial look. The little factory in front is just foamcore with a couple of short PVC pipe fittings.


Desert ruins... Note that their bases are L-shaped. That way I can fit them together to make bigger building footprints...


Of course, wall rubble makes great barricades and can represent even more demolished buildings.


Talking about Planetstrike, does that look like it could be a Skyshield landing pad to you? It's a whole lot cheaper...


And maybe those could be defensive walls around a bunker. How many foamcore defensive lines do you think you can get out of $20 worth of foamcore?


These are bridges. Some are meant as river crossing bridges. The rear ones were meant to be between buildings but several strung together make a great elevated monorail track.


Watch out for the scraps you cut out while making something. These were left over from the monorails. I slapped them on a base and now they're Imperial message boards. Some people like the Imperium and some people don't...


Now these are city walls! Constantinople had nothing on these bad boys!


But if you need something for a small fort or a compound, these'll work nicely, too.


This is one of my biggest pieces. This factory has a 15x15" footprint. It's foamcore with some plasticard on the doors and PVC pipes for tubes and smokestacks.


And lastly, you've seen these before. Who says you're restricted to blocky Imperial architecture?


So, I hope you got some ideas from this. when it comes to foamcore, you're pretty much limited by the thickness of the foamcore and your imagination (and maybe the size of your graph paper but you can buy that bigger!) so get out your pencils. Get drawing, get gluing and get cutting!

Saturday, July 11, 2009

Wall & Foamcore Tutorial 3

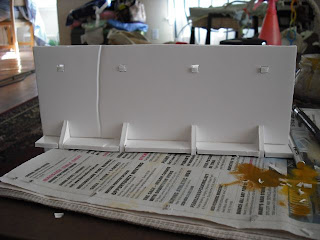
What did I make? Another wall! What are the odds? Actually, I have a couple more to build so don't be amazed when I present them in the next few days. But, then again, that's not all I did. I also continued with the foamcore tutorial.

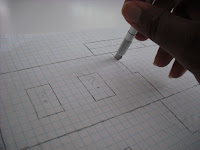
Yesterday I drew a simple building on graph paper. Normally I would have made photocopies of it but for our purposes today, I'm going to use the original drawn template itself. First you need your tools: a glue stick, a bottle of glue and an exacto knife. 
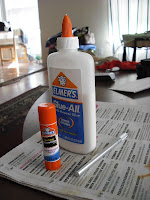
Once you have those out, we're ready to begin.

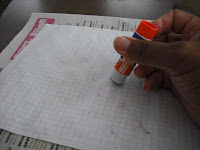
Take your glue stick and run it on the back of the template so you can stick it to the foamcore. If you want to be hardcore about it, a couple of days before you use it, open the glue stick and let it dry out. The glue in there is moist and when you put it on the paper, it will absorb into and warp the paper a bit. If you leave the glue stick open, excess moisture will evaporate giving you less chance of that happening. That's also why you want to photocopy the template. Copy paper is less absorbent than graph paper so you won't have to worry about it as much.

Adhere the glued template to the foamcore. Make sure it's flat and as even as possible. Notice how my sticking has ripples in it? That's because of moisture warping the graph paper as I mentioned before. 
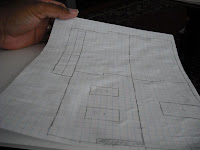
Try to do the best you can but don't stress if there's a bubble or anything like that. Unless you're doing precision cuts or something like that, it won't really matter too much for out purposes.

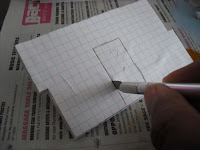
This is when you get out the exacto knife and start cutting. Once again, try to stay with your lines the best you can, but don't stress if it isn't perfect. Foamcore is light enough and strong enough that even if you don't make a perfect line, the edges can still adhere well to things when gluing. Another thing that I'd take the time to mention is that if you plan on building a lot of buildings or big ones, you might consider buying a mat cutter. Even an inexpensive one will help with your straight lines and allow you to cut through board at angles if you want. If I had to start building again from the beginning, knowing what I know now, I would definitely invest in one. I also chose to cut out the door and windows. I recommend taking a little bit of scrap foamcore and gluing it behind the open sections. once you've finished and are ready, it's a little hard to paint the inside of the building. Besides, why waste the paint?

Once you've done the cutting, you'll be left with the various parts. Peel off the paper. A little might stick, but that's OK. it'll get painted over in the end so it won't hurt anything. It's a good time to double check and make sure everything is the proper size. I'll tell you a secret. When I drew this out, I miscounted one of the sides and made it a hair too long. It was an easy fix, but it's a perfect reason why you don't want to use your originals. If I still had it, I could erase and redraw a couple of lines and if would have been perfect for reproduction.

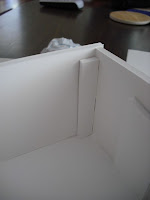
Note how these two building sides join together? That way, when I glue them, they'll be more stable since I''ll glue each join in two different places instead of one that could just snap. When I make taller buildings, I'll continue that up the side so they all fit together like teeth. Lots of extra stability makes for more durability...

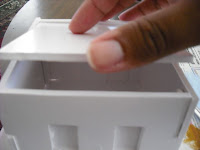
Start gluing the joins and also the walls to the base. Usually if you glue two walls together and then to the base, it's easier to glue the other walls on. You may have to hold pieces in place for a minute but it should go together easily. And don't forget to glue the scrap foamcore to the door and windows! 
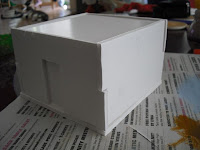
Glue the supports in the corners for the roof. They hold up the roof and, if you glue on three sides, give extra stability to the structure as a whole.

Make sure you finish everything you're going to do inside because now it's time to glue on the roof. Once you've done that, there's not getting back in there without doing some cutting. However, since it's just foamcore, if you make a mistake, turn it into a ruin or something and build another correctly. That's the great thing about foamcore buildings. if you mess them up, who cares? Make another!

Lastly, glue on the roof. It only takes a little bit on each support and letting it settle.

Voila! You new have a completed building. You may want to embellish it a little. A Plasticard logo could be cool. I like to take the bottom halves of plastic easter eggs and glue them on top for domes. Some bits glued on could make this a communication center or a temple or storage depot or whatever else you want. And of course, you can make buildings of almost any size and shape fore just about any function. Or you can go smaller, making barricades, bunkers and anything else you can think of. Heck, I'm even working out how to make vehicles and Rhinos out of foamcore so I can make wrecked vehicles for more terrain. The possibilities are almost endless. In fact, tomorrow, I'm going to show you some of the things I've made so you can see for yourself and maybe get some ideas.

Until then, good luck and good cutting!

Friday, July 10, 2009

Wall & Foamcore Tutorial Part 2

WallLast night I got another wall done. Nothing fancy. I have been noticing a minor problem with my last two walls, though. when foamcore sits around for a long time and isn't entirely flat, it will bow a little. Because of this, I'm having a harder time gluing things together because they're not entirely flush. No biggie, though. Once it's painted, you probably won't be able to tell it from any other wall.

Building TemplateSo let's make a foamcore building. The first thing you want to do is to pull out graph paper and draw it out. As you can see to the left, I have drawn out a simple intact square building that is 5x5x3". If you're starting with no buildings and want to make a lot of them, I recommend settling on a scale so that you can use multiple pieces and they look like they belong together. Or you can make each piece different. They're your buildings! I base almost everything I build on 5x5" and use 3" for each floor. If I had to start again from scratch, I might go to 6x6 or stay at 5x5 and use 2.5" per floor but I'm pretty happy with the scale I use currently for the most part. As you can see, each of the sides is the same and I've put in dovetails of a sort for stability when its assembled. You could totaly make them interlocking teeth but this is good for a simple building. Also remember that this is supposed to be in three dimensions so you have to account for the thickness of walls when you draw this out. That's easy with 4/inch graph paper. Just use a 1/4" (one grid block) to account for thickness since the foamcore will be 3/16" thick. Not quite the same, but certainly good enough for our purposes. I drew in a door and windows on a couple walls. You may or may not want to cut them out. Sometimes, I paint the doors or windows on. Often I cut them out and then glue a scrap piece of foamcore behind them so the depth is there. Paint black in the recessed area and it looks great. When you get into more complex buildings, you may want to think about places to slot things to add more stability or functionality but that's for later.

Base & RoofI also drew out a base and a roof. Note that the base is 5x5 but the roof is 4.5x4.5. the building is 5x5 but you have to account the the thickness of the wall so the roof is 4.5x4.5 to fit between the walls when they're glued together. And how will the roof stay up? Well, if you check out the previous page, I have some bars up there for roof supports. Glue them on the inside corners and then set the roof on top of them. If you want to be clever, you could cut out the doors and windows and cut a larger piece of foamcore that can cover the door and windows on the inside and can also support the roof. They're your buildings and you can do whatever you want with them.

Lastly, you probably want to go out and make photocopies of your templates for several reasons. If you like the building, you can use the same template over and over without redrawing it every time. If there's something wrong with the drawing and the building doesn't fit together, you can erase and redraw a couple of lines and the template is fixed. Of course, you use up a lot less graph paper that way. Lastly and more importantly, the actual paper in graph paper is weaker than standard copy paper which means it's more likely to tear or warp a little when you glue it to the foam core. Also it's less likely to peel off cleanly once you've done your cutting.

Now you've designed your first building. That's the hard part. Tomorrow you're going to put it on the foamcore and cut it out.

Thursday, July 9, 2009

Wall & A Foamcore Tutorial Begins

Bare WallThis is what I got done last night. What is it? It's a wall. It's three inches high and has a walkway on the back so that minis can stand on the wall and look or shoot out. Normally one can crank out several of these in an evening, but last night being...complicated, I was only able to manage one. It did get me thinking, though. Making things out of foamcore is really simple but I never did it until a few years ago, primarily because I thought I couldn't do it. But it's easy as all get out so I'm going to start a tutorial on making buildings and structures out of foamcore.

Desert BuildingsWhat is foamcore? Foamcore is a type of board that is created by gluing and pressing paper to the sides of thin sheets of polystyrene foam. The end result is a light, durable and strong board which can easily be cut or shaped. Most foamcore is white with white backing paper. It can be found with other colors of paper and, more recently, in black with black foam.

Desert WallsWhat do you need to start making buildings? Well first you need some foamcore. What kind of foamcore will be right for you? Well, good old white foamcore, in my humble opinion, is the best. Why? You can get it many places and sometimes cheaply. While you can find it at art stores and grocery stores, check out craft stores like Michael's and Hobby Lobby. They almost always have it cheapest and often have sales on it. Let's assume you're looking for a 20x30" sheet. At art stores, it tends to be a little expensive ($3-4 per sheet). Grocery stores will have better prices but still be a little high ($2-2.50). Craft stores will often have it cheapest ($1-1.50) and when they have sales you can get it by the arm load. Last time I picked some up was during a sale and I got it for 50 cents a sheet! Black foamcore is another good choice but for a different reason. It's very expensive ($5-6!) and only art or craft stores will have it. The big upside, however is that if your terrain gets damaged for some reason, it'll be harder to tell because the rip or tear will be black. You can pass it off as part of the design or construction. But if white foamcore gets damaged, there's this obvious white spot sticking out. If you're making something that will only get moderate use (you and your buddies), white is fine. If you're doing something more high traffic (club or store terrain) use black. Either way, start with white because mistakes are much cheaper... You'll need a few other things, too. Graph paper (4/inch), glue sticks, PVA or school glue, an exacto knife and a little bit of room will finish you out.

Over the next few posts, in addition to whatever I manage to accomplish normally, I'm going to walk designing, cutting and building a simple structure, give some tricks and ideas on how to embellish them and show some other buildings and structures you may want to consider. When we're done, you'll be able to make an entire world of terrain on your own!

Wednesday, July 8, 2009

Old Ruins

Old RuinsI mean that title in both senses... So last night I sprayed down Whirlwind #1 again and the various other stuff with it and then sat down and found myself in a bit of a quandary. What now? I don't feel like assembling another Rhino frame for Whirlwind #2. I don't feel like digging into one of the Predators. I don't feel like gluing and cutting foamcore. But I want to do something so what should I do? The answer was actually staring me in the face. Many, many moons ago, I acquired a bunch of 3rd Ed. ruins, drybrushed on some white and fortress gray and that was it. They were bland and boring but serviceable. Now I'm looking at them and thinking about how bland and flat they are. Well, enough was enough! I decided to pretty them up for a new millennium. And since it wasn't all that complicated, I managed to get a bunch done. Basically I painted either snakebite brown, golden yellow, bleached bone or a combination thereof onto all the brick areas, trying to give it a more desert stone look and then drybrushed them all with space wolf gray. I'm not jumping for joy over how they came out, but they're quite a bit better than they were before.

A funny thing is that to my eye, the brownish color seemed flat and blended into the stone but looking at this picture, they look decent without being garish or overwhelming. In fact, for the past weeks that I've been posting these pictures, I find that I may be kinda blah about how the thing itself came out, but once I look at a picture, I'm happy with the outcome. It looks like I've come up with a standard operating procedure for the future. Whenever I paint something, I take pictures of it. If I like the pictures, it's fine. If I don't, back to the drawing board or painting station until I do like it. Brilliant!

I took a look at the box for GW's Mines, Bombs and Booby Traps. A bazillion resin markers for fairly cheap? Not bad, guys. I think I'll pick one up when I have money again. I already want to get a Blastscape to add to my craters, a Battlescape and some Defense Lines. And yes, I do have a soft spot for the other buildings. Sure, I don't need a Bastion because I can make equivalents much more cheaply (and have) but for the most part, I've been very satisfied with GW's buildings. Their minis I'll find for as cheap as I can, but their buildings I'm actually willing to pay full price for because they're usually worth it.

The plan for tonight is to start gluing the templates for short walls and towers on foamcore so that I can start cutting in the next few days and then, with the time remaining paint up Whirlwind #1. Not that I'll have much time after that, but if I do, I think I'll start assembling Whirlwind #2. That's the plan, but then again, no plan survives contact with the enemy. Let's see what I actually manage to accomplish...

Tuesday, July 7, 2009

Webway Portals

Webway PortalsSo last night I was wondering what I wanted to do with the little time I had. I thought about my Predators and about making some more foamcore walls and towers since I've been thinking about Planetstrike. But I decided to get in there and finish something outstanding before going on to something new. I pulled out the portals and got to work. Drybrushed Bleached Bone and then white over them. They're OK, but I wonder if I shouldn't have flat out painted them Bone or something similar. Either way, at this point, I was ready to have them done and, as with many other pieces of terrain I have, they're good enough. I'm sure if I put them on a table, people will recognize what they are and that's the point. Cracked open the cheapo bag of plastic gemstones and glued those bad boys on and voila! And I've got enough stones left to make another one if I like. I'm thinking I may make two or three really tall portals (the original template is full page size and these were shrunk down to half size) but not this week or really anytime soon. I find that cutting curves is not only hard, but it stats to hurt my hands after a while. Maybe I'm just old. We'll stick to blocky Imperial architecture for a while.

I sprayed Whirlwind #1 and the launchers and plates last night. I also found a couple of repair jobs I should just whip out. As I mentioned before, I was thinking about towers and walls. I have several types of foamcore walls: small inch high walls like hasty fortifications, 3-inch high walls with walkways that are good for compound or fortress walls and 6-inch high, 2-inch thick walls that are more like city walls. The taller walls are good designs that are sturdy and easy to build. I might post scans of the templates for other people to use. The towers are three story tall towers with an open area on the third floor and a roof. I made them to be stand alone towers but they could go well with the really tall walls. I'm also thinking of making a stepped tall city wall. Something where three inches up there's a level that can be defended with troops and then at 6 inches there's the top. That way, defending forces can put twice as much firepower on a wall and invading forces can fight their way up the wall. I'm thinking about the Whirlwinds, too. I should have flipped the pieces and resprayed them last night or this morning but I didn't so I'll have to do that when I get home so I've got at least another day before I can work on those.

Monday, July 6, 2009

Planetstrike

Well, it's been quite a long weekend what with in-laws and parties and all that jazz. Unfortunately, I had no time to get in there and get anything painted what with having people over all the time all weekend and all. But hopefully that will change tonight.

So, I went out and got Planetstrike this weekend (though I probably shouldn't have). Having only power-skimmed it, I'm liking it. The fluff is interesting and I like the possibilities that this format presents. Part of me is wondering how an Apocalypse Planetstrike might work out, but I have the feeling that that would be the work of weeks to get something like that going. That and setup would be half a day on its own. I think I will keep that idea in the realm of idle speculation for now.

One other thing... While preparing for this weekend's festivities, I ran back across another Predator that I must have found recently and then forgot about again. That's two Preds I have waiting now, one old school, one new school. I might work on those later this week, but I think I should finish the second Whirlwind I started last week and then paint both Whirlwinds. Oh, yeah, the Eldar warpgates, too... Alright, maybe the Predators will have to wait until next week.

My one little bit of crowing... A few friends who are current or former 40K players came to the Saturday party at my house and I got a few impressed compliments on the amount of terrain I have managed to build and amass over the last few years. That was cool. It's nice to have your work complimented. That's not why I do it, but it's nice nonetheless.

Thursday, July 2, 2009

Whirlwind Launcher

Whirlwind launcherLast night was kinda hectic for a number of reasons. I only really had time to build the launcher for Whirlwind #2, cut off the plate and glue together the top doors for Whirlwind #1. Not too much accomplished, right? Actually, I'm quite satisfied. This is the ultimate goal. I'm not trying to complete everything I have within a time frame. The goal is to make sure I do a little something every day. Well, this isn't much, but it's something. Besides, if I really had to, I could just paint up the launcher and then put it in the Razorback I just finished instead of the lazcannons. I could run four Whirlwinds that way without putting together another thing.

What I really need are tables. I have this big space in my current house that I could play games in if I just had tables to play them on. Unfortunately, I don't have money to go out and buy them right now. This is especially tragic because a little while back, I had the money but not the space. What I also want to do is take a page from the Realms of Battle board. I kinda like that way it's made and the entire set of boards, while a little expensive and skull-covered for my liking, is worth it for what you get, but why spend $300 on a board with 6 panels when you can buy 2'x2' sections of birch or some other hard wood for $4-8 apiece and then paint them/terrain them anyway you want? I plan (once I have tables) to buy 20 boards, paint each one of them a different color on each side (either green, tan, gray, white or black) and then I'll have eight of any one color or I can combine different colors for different surfaces (plains on the outskirts of town, desert at the edge of a paved base, etc.) and, with cheap paint, will cost less than $150. Or, maybe, I start small with six for $40ish and add a few new ones each month. That beats $300 with a stick. Of course, maybe I should get some tables first...

Wednesday, July 1, 2009

Whirlwind

WhirlwindThis is Whirlwind #1 from my Suppression Force. Strangely enough, this one took quite a bit longer than I thought it would to assemble. Maybe it was some of the interruptions over the evening. Maybe it was the launcher assembly which seems quite delicate at times. Of course, the top plate and main weapon have not and will not be glued on so I can run it as a Rhino if need be. When all the Rhino frame vehicles I have are done, I'll have five that can serve double duty as either a Rhino or whatever it is supposed to be.

Oh, yes, note that the picture kinda sucks today. Usually I take the pics in the morning when the sun is coming in (natural light pics tend to be the best) or I take them inthe evening under the room lighting and then correct the color a bit (the lighting in the living room is a bit yellowish as are most incandescent bulbs). This morning it was overcast outside so I used the flash. As the wise man said, "meh". Not a fan of the flash for this, but what can you do?

I've been thinking that maybe it is time for me to try to talk to some people about doing an Apocalypse battle. The people I normally play with don't like Apoc too much and I kinda understand why. With D-strength weapons, a lot of things you can bring to the filed can and do go up in smoke very quickly. If you only have a small force, that means you can be completely wiped out or wiped out to the point that you can no longer have an effect on the battle in the blink of an eye. That's why, instead of having multiple players with smaller forces combined into a big force, I want to play an opponent with a large force against my large force. Losing 2,000 points in a turn is a big deal when you control 3,000 but not so much when you control 10,000. And I really want to put these bad boys on the field in a big battle. I've fielded a Company in 3,000 points before and that was cool, but it could be better. Maybe I should talk to BFG about it and see if anyone is willing to play me...

I don't know how much work I'll be able to get done over the next few days. The in-laws are coming into town for 4th of July shenanigans so there's house cleaning, party preparation and pie making that have to be done between now and Saturday. I'll see if I can get in a bit of time. The goal isn't to complete everything immediately. It's to keep going little by little...