Showing posts with label terrain. Show all posts

Friday, March 26, 2010

Shrine of the Aquila

Loyal readers, I am a weak man.

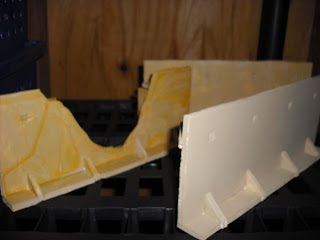
So when I photographed the parts of this last night, I couldn't help thinking about how I wanted to put it together. So I dropped everything and did it. What do you think? I didn't show pictures of the back. There are several walk ways and room to put minis behind the bottommost level wall under the balcony. Heck, it's as tall as the tower from the Fortress. I'm also thinking about adding a few buttresses and lamps on the front, but other than a few minor things, it's done.

There's no way I'm going to start painting this thing anytime soon. If I get to play with it, it's going to be bare plastic for a while. But when I do, it'll look sweet! Since this is a shrine to eh Undying Emperor or some kind of crap like that, I'm thinking white with gold details. Very striking! But I may change my mind by the time that comes around so we'll wait ad see on that one...

Thursday, March 25, 2010

Shrine of the Aquila and Sanctum

So I totally shouldn't have gotten this. Especially since I have the great project still looming. But I've wanted a Shrine of the Aquila for quite a while and when the opportunity came on EBay, I grabbed it. I also envisioned something more complex than just the big walls of the Shrine so I got the parts of a Sanctum, too. I'm going to put them all together to make one big Shrine! I'm envisioning a front made up of the broken sections of the Shrine with a large recessed balcony leading to the steps and door of the Shrine and the entire thing raised by the Sanctum as a lower level.

You know what? I'm so excited I think I'm going to go work on it now! I promise it won't stay me from the Fortress, but I've got to get this thing started!

Wednesday, March 10, 2010

Even More Fortress of Redemption

Alright, I have to tell you all a secret. I have been pro- crastinating. It isn't an active thing, but I've known for days that I've been doing it. Over the weekend I was afraid it would rain but I was wrong and I totally got this bad boy sprayed. But since then I've been stalled. Why? because I'm still debating how I want to paint it and am a little reticent to start work until I know. This is bad because I could have started on the tower already because I totally know how I'm going to paint it: Ultra Blue for the cloak, silver sword blade, electric blue sash/banner, and wings drybrushed first white then electric blue and then a highlighted with bleached bone and more white. The big debate is how will I do the rest of it? I could go bright and use white walls and electric blue supports. I could go dark and use fortress gray walls and boltgun supports. Just last night, I started thinking about a desert motif with snakebite/bleached bone walls. I just don't quite know and I'm afraid I'll have a little buyer's remorse if I'm not happy with my choice. I guess the moral to this story is to man up, do something and quit dithering about the little stuff. Just do it! I know better than anyone that if I don't like it, I can always paint it again!

And that is my moral for all of you today. Don't think too hard about your paint job or you'll end up paralyzed like me. Paint! The worst that can happen is you have to strip it and paint it again!

Thursday, March 4, 2010

More Fortress of Redemption


Isn't it magnificent! It's more awesome than I expected! I can't wait to start painting this old boy!

But I'm going to have to. While I got the main structures completed last night, I didn't have time to get the extra bits done (the lascannons, heavy bolters and other little flourishes). If the weather reports hold as they are supposed to, tomorrow will start a weekend of cold with off and on wet and I'm not taking chances with this lovely building. Besides, it's not like I have a dearth of things to paint. I've got a Terminator squad and a Vanguard squad along with a Black Reach Tac squad sprayed and waiting for work. I could whip up more squads or the Rhinos I have sitting in parts. And then there are the squads and vehicles I still have in their boxes unopened.

Man, sometimes I think to myself "why don't I just say to heck with it and decide to make an entire Chapter?"...

Wednesday, March 3, 2010

Fortress of Redemption! WOOT!

I went out on my front steps to find a package waiting for me! It arrived a bit earlier than I expected. As you can imagine, I have set the Thunderfire Cannon aside for now. I wanted to get to work on this bad boy so badly, I almost couldn't wait! But wait I did until evening and got to work!

I will admit, even though I saw sprues at game stores and reviews on Youtube, I'm impressed at how detailed this thing is. And freakin' huge, too!

Last night, I only got the far bunker assembled. Tonight I will work on the smaller bunker and the tower. I should be done with assembly tomorrow night but with luck, I may have enough time to get the entire thing done. I hope so because tomorrow is supposed to be a lovely day outside and it would be a great time to spray paint this thing down. It's been so cold and crappy on and off for the last few weeks that I haven't really been able to spraypaint so I haven't been assembling too many things. Here's hoping that I can git' the proverbial "'er" done and quickly before the weather turns again!

Monday, August 17, 2009

Palm Trees

In the meantime, while I was waiting for the Veterans to dry from the spray painting, I took a few minutes to do something I've been wanting to do for a very long time; I made palm tree stands. Many moons ago, I found that rear taller palm tree at a party supply store. I kinda liked the tree but it was $3 on sale and there were no others. I bought it with the thought of getting more later, but I didn't want to spend that much on each tree. A few months ago, I was at a Tar-Djay and I found a safari play set with wild animals and palm trees in it for $10. Yesterday I whipped out the cutters, cut the playset palms into separate trees and glued them all to cds/bases. And wait until I paint the bases and maybe put a little sand on them. They should look pretty neat. We'll see about working more on the veterans tonight or tomorrow, I think.

Tuesday, August 4, 2009

Two Towers

Well, there they are , cleaned up and finished. Simple towers that can serve as simple bastions. I haven't set them up with walls yet to get a feel for them yet, but that's alright because I bet they'll look just fine. Tonight, time permitting, I may try to make one or two more.

I'm running into an interesting problem... So the friend of mine who plays Guard? He has decided he wants to make a house rule. He wants to play with bigger tables and add a turn to the game. Why? Well, why do you think? This is the same guy who said he wouldn't even play 40K again until he could field 6 Basilisks. Now he doesn't like the small size of the tables. To an extent I agree with him. 6'x4' isn't much. It undercuts mobility and vastly decreases the effectiveness of firepower (as if that was king as it is). However, I know him. All he wants is more time to use those ungodly ranges that few else can touch to undo his opponent with big guns. I foresee breaking my own personal feelings and using all drop armies on him a few times to show the futility of that thinking. He wants to tilt the balance to favor himself winning when you should plan to do the best you can with what you have. Having mentioned this to him, he now seems to be more interested in Apocalypse which is cool because I like Apoc and I know he wants the bigger tables. However, when it comes to Apoc, he's fixated on titans and superheavies (which he can't afford and doesn't want to scratch build). And if it doesn't work out for him that way, he's taling about a 'Nid army made up of countless gaunts of all types. Jeez... I love the guy, but he's a total power gamer so playing him will be grating. But it will be playing with a friend So I guess I can live with that.

Monday, August 3, 2009

Two Towers

Well, I got two towers built and mostly painted. Tonight I'm going to do some touchup work and black in the windows and then these will be great bastions and wall towers. Definitely need at least two more but the standing plan is for three more anyway.

Was on Bell of Lost Souls forum while people were talking about the new Space Hulk. Someone mentioned that it would probably come out with more Terminators. Speaking as someone who has 40 Termies painted and another 35 basecoated or unassembled, do we really need more Terminators? I had to make the conscious choice not to get more when Black Reach ones were floating around like candy. I like Terminators, but I feel no need, either fluffwise or as a player, to have an entire Terminator Company. However, your proverbial mileage may vary. When I mentioned that, someone immediately jumped in to ask how much I wanted for the unassembled ones. Different strokes...

Sunday, August 2, 2009

Walls & Building Finally Complete

Finally finished up the touch ups on the walls and building. Took me long enough, eh? Now they get to join the pantheon of terrain I already have. Apparently my terrain collection has had an effect that I never originally intended.

You see, I started playing 40k with 3rd Edition. Several of my friends played 2nd Ed and Rogue Trader back in the day and I got a little taste of interest from those (I'll tell you one day about my first attempt at painting, remembered fondly as the "terra-cotta Marine") but what they were playing just didn't do it for me. I didn't like the idea of a tactical war game where one character or one vehicle could literally rule the field by taking on the entire opposing army alone. And that was a good description of those days. Imagine a character with enough war gear to outfit an entire army, multiple wounds and 3 to 5 saves, all of which are rolled when damage is incoming, dealing 10 attacks with power weapons, finger lasers and whatever other kind of craziness could be packed on. Believe me, you couldn't even kill a Land Raider back then. Every new unit was power cranked to be even more devastating. Remember when Warp Spiders used flamer templates and ignored armor saves? I do. :) Anyway, when 3rd Ed came out, they shifted the game away from characters and on to squads. And that's when I got into the game. That's also when those friends got out. A few weeks ago, we threw a little 4th of July soiree and one of them was over. When he saw all the terrain I've made, he was impressed. So much so that he's thinking about pulling out his Orks and playing again. This particular friend, though he hasn't played much in the last decade has still collected minis off and onin that time. He has Ork and Eldar armies that, if assembled and painted, would probably equal my Marine Army points wise. And another friend has been talking to me about getting back in and building a board in his garage and working on his old Guard army. I guess I've given them the bug again and I'm good with that.

This morning I put some templates on foam core for planned desert terrain, specifically two story buildings that I can use as bastions, wall towers or just stand alone generic buildings. With luck, I'll be able to cut them out and assemble them tonight, If I'm really lucky, I'll be able to paint them, but I wouldn't bet on that. Either way, we'll cross that bridge when we get to it.

Thursday, July 30, 2009

Walls & Building

Alright, I did the back sides of the walls last night. Now all I need is a little touch up, especially in corners, and they'll be good to go. While I was at it, I painted the building from the foamcore tutorial last night. Once again, I need to black in the windows and door and it'll be done.

Not too much to report other than that. I've been thinking about a terrain piece using a couple of those slimfast cans I acquired a number of years ago and still haven't used. They would be another addition to my one-day-to-be-accomplished industrial tank farm that I've been considering for years. Of course, this is just a side project that I don't feel pressure on since it's been rattling around for about 5 years and I've only built one piece... That doesn't mean I shouldn't pick up a few more small coffee cans, just in case.

Wednesday, July 29, 2009

Half-Painted Walls

Well, I'm halfway to my previously stated short term goal for the week. Last night I whipped out a bottle of paint and a foam brush and painted the front sides of those five walls of mine. Now they taunt me less with their reflective whiteness. Tonight I hope to get to the back sides of them and maybe do another once over on the fronts. The foam brush covers quickly and well, but you have to wait for paint to completely dry before you can go over it again or it streaks badly or, even worse, wears off and leaves big white sections showing through. Hopefully, by the weekend, I'll have these done and will have started the bastions.

I've run into a minor pickle. You see, I have another painting project I'm doing for a friend of mine. It's not 40K related but it's something I want to focus on and devote time to. Basically, I'm not sure whether I should put the work in progress here or not. Give me a couple of days to think about it.

I think when I've made my desert bastions and acquired and painted boards, I'm going to to arrange a battle with friends at my house. The entire point of building all this terrain and table acquisition is to be able to play more battles at home. I've always wanted to but I've never really had the space to do so. Now I do but it's space that's...environmentally challenged in that it's too hot in the summer and too cold in the winter to really use. I may have to plan a day in the fall that's good enough but considering the weather here in fall, that'll still be rough and too hot. But darn-it-all, I want to play in my own home and I will come hell or high water!

Tuesday, July 28, 2009

More Aquila Wreckage

Technically, it's the same wreckage since this is one of the pieces from a few days ago. I decided that I wanted to go ahead with that alternate color scheme I has mentioned. I quite like it. Unfortunately, the picture is kinda dark so you can't see the desert (for lack of a better term) sands around it too well. That and it's a little darker than I had hoped but that's just because I quit keeping bad moon yellow on hand a number of years ago and went to golden yellow exclusively. Heck, to get this light a sand color I had to layer and drybrush quite a bit (snakebite leather, yellow, bleached bone, yellow, white, yellow). Of course, I'm reminded that GW actually has a desert "yellow"(that is really more of a brown). Maybe, at some point when I have disposable income again, I might pick some up. I'm also thinking that this piece would look a bit cooler with some weathering. I may check out some sites and get some weathering ideas. If I don't, well, it could be just recently crashed. And I must admit that I like this look much better than the DA green, black and boltgun metal of my old pieces.

Short term goal for the week: I want to paint those walls I made a couple of weeks ago. They're just sitting in all their reflective white glory, shaming me into guilt. Might as well paint that building I made for the foamcore tutorial while I'm at it.

Long term goal for the coming month: I'm going to start making more foamcore two story buildings for desert terrain. A two story building makes a decent cheap bastion and I've got tons of ruins already for when any gets destroyed. I intend to have 5 done by mid-month (which isn't an outrageous plan since I could make that over a weekend if I had some time and minimal distractions.

Of course, all goals are subject to change, whim and the general availibility of time and whatnot.

Final thought: I have yet to play a Planetstrike game. I haven't been able to go to the local game stores (Austin's two best game stores are both within five minutes drive) and my normal group is on a bit of a seasonal 40K downswing. We play a lot for a while, then real life gets in the way and we don't play so much, wash, rinse, repeat. But soon, I hope...

Saturday, July 25, 2009

Aquila Wreckage

Wow! It feels like forever! Well, alright, not quite forever but it's been a while. Definitely longer than I intended or would like. In theory I'm doing this every day or every other day. However, this has been a few days from heck so you get back to things when you can.

My accomplishment has been a small one. I took seven Macragge Aquila terrain pieces and drybrushed the ever loving crap out of them white. Two of them are left over from an old set of then I had. The rest I acquired a couple of years ago. I'll probably paint the two older ones to match the other ones I have in black and green. The newer ones though, I'm thinking about doing them in a much lighter scheme. In fact, I'm thinking about painting them white with light blue detailing. That might look really neat. As for the ground they're crashed in, I've decided to paint it up in desert colors to go along with my goal of having a more robust desert set.

Once again, the goal is not to accomplish a lot. It's to do a little bit each day. And finally, after a bad few days, I'm back on track.

Tuesday, July 21, 2009

A Tale In The Desert, A War In The Sun

It's been a long weekend filled with mostly fun, childcare and thought. Now that I have tables, it's time for me to seriously think about what kind of game setup I want to have. Certain things are a given but certain things have required some decision on my part.

First, one of my projects over the next few months will be to start acquiring 2x2' birch boards from a home improvement store. I will probably acquire them from Lowe's. The one that rhymes with "Dome Creep-o"...well, I have a few problems with the opinions and political biases of their owner so I vote with my dollar and spend them elsewhere. I don't know if Lowe's owner is any better, but he/they are smart enough to keep his/their mouths shut about it. That and Lowe's definitely has boards in stock because that's where I saw them and got the idea. I'm planning on buying six to start with (I think the birch ones were $6 each) so I can start with a 4x6" area to play on (just like the GW Battleboard set) and then picking up three more each month so I can have larger fields to play on.

Second, I've decided that I want to have a robust set of desert themed terrain. More specifically, I'd like to be able to have a large fortress or small city much like the one pictured above or possible the long walled outskirts of a desert town. Adding the short walls I just made to the ones I have brings me up to twelve and a simple gatehouse. I have a few small buildings but only one good tower to form corner defenses and interior structures. So I need to make a few small buildings and a bunch of towers. I figure five of each would be a good start. Ruins won't be an issue since I have more than a good handful of those.

Third, I need to make some non-city terrain for this. Palm tree groves and oases and wells would be the ticket. Palm trees are relatively easy. I've already found some kid toy sets that have palm trees so I can give the animals away (mine is too young for a while) and keep the trees to make stands of them. A few trees and some green stuff with a bit of water effect will make an oasis. If I find some kind of single brick set, I could make a well, I guess. Heck, I could probably make the bricks out of some kind of cheap modeling clay or something similar. Some more water effects and a frame of some kind and it could look pretty good.

So that's the beginning of the plan. Now let's see what I can get done to step closer to accomplishing it.

Thursday, July 16, 2009

The Last Wall For a While

Before you is the last short wall I intend to make for a while. Just for the sake of full disclosure, if you look in the background, you can see the wall I completed before but recycled a picture for. Soon, I'm going to paint the five walls I've recently completed but I haven't decided if I want to do them all in tan and continue my desert/adobe theme of if I should do them in gray and make them part of my industrial buildings. I'm leaning towards desert because industrial areas tend to have open areas and more wide-ranging and mechanized defenses while out in the desert, walls are more useful for shade and against the occasional in coming invader or some kind of crap like that. In addition, I like the desert look a little more so I am leaning in that direction. I noticed a while back that if you put two of these walls back to back, they make a good elevated pathway. I noticed this morning that, thanks to the notches I put in the base so that they could stand at angles, I can fit a building to them well so I'm thinking that a few of these walls together like that and a few buildings together could make a pretty cool Indomitable Fortress.

Started drawing out that Memorial column I was talking about before. I have a couple of small issues to work out, but I see great potential for it as a terrain piece. On a completely different note, I'm also thinking about making more static defenses like sandbag walls, concertina wire and tank traps. The sandbag walls, well, there are ways to make them from scratch but I like the Tamiya ones a lot and they're cheap ($5/box) and they look good. One box can make an inch high tank redoubt or four five in ch long sandbag walls. If you pick up one a month, after a while you'll be swimming in sandbag fortifications. As for concertina wire and tank traps, they may be the subject of a future entry...

Haven't decided what to do next. You'll probably know the day after I do. I've got several things to paint and I think I'll do a bit of that for a while. Besides, I don't want to go out and buy any foamcore right now. I'll have to soon enough when I'm ready to build the Memorial column.

Wednesday, July 15, 2009

Wall

What did I get done last night? I assembled another wall. Actually, I also painted a couple of miniature ships for another game system entirely but we're concerning ourselves with 40K here so that other stuff doesn't matter. I also have to ask your forgiveness for the photograph. I took a picture of the wall I made last night, but I don't have it on hand for this and since one wall looks remarkably like another wall, I decided to recycle a wall pic. Consider me properly castigated. I'll never do it again. :)

I'm thinking about a quick little project. I was reading an article from some women's magazine about interesting lighthouses and the shape of one caught my eye. It was something easy to do with foamcore and I envisioned it more as the base and column of some kind of memorial or statue. Recently I made a memorial out of a Black Reach Captain (I've got 3 or 4 I'll never use for play), a dice box (you know the ones that dice bricks come in) and some Basilica buttresses all mounted on a CD (good use for coasters). Well, a CD is just a bit smaller than 5x5" (120mm or 4.72") so if I made this base column that's based on this lighthouse, it'll be just the right size to top with this statue. It's also a good reason to make more statues (besides the fact that more and varied terrain is always good).

As a side mention to the foamcore design tutorial and because this entry made me think of it, here's something to think about. Of course you need graph paper to design your buildings. Well, you don't NEED it, but it helps a lot. But 8.5x11" graph paper isn't suited for bigger things which you'll probably eventually want to make. You could make lots of smaller pieces and put them together to make something bigger, but sometimes you want a big facade for a building or something similar. Trust me. Those city walls? The factory? I didn't do them on normal sized sheets. Go out to an art supply store (or, in my case, local blueprint company) and you'll find graph paper pads that are 11x17". They're obviously a little more expensive, but when you want to do something big, they can't be beat. If you're going to make a lot of buildings, it's a good investment if and/or when you decide to go bigger.

Monday, July 13, 2009

Some Things I've Done With Foamcore

So, I've been talking about all this stuff you can build with foam core. Well, it's time to show you some of the things I've done. Maybe you'll get inspired!

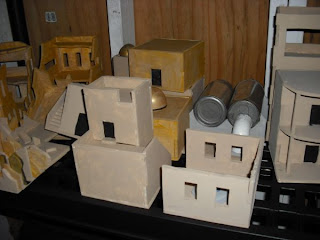
Desert buildings. Note the one at the far right front. That's basically the basic building we built last time with the bottom of a plastic easter egg on top.


Similar buildings with an industrial look. The little factory in front is just foamcore with a couple of short PVC pipe fittings.


Desert ruins... Note that their bases are L-shaped. That way I can fit them together to make bigger building footprints...


Of course, wall rubble makes great barricades and can represent even more demolished buildings.


Talking about Planetstrike, does that look like it could be a Skyshield landing pad to you? It's a whole lot cheaper...


And maybe those could be defensive walls around a bunker. How many foamcore defensive lines do you think you can get out of $20 worth of foamcore?


These are bridges. Some are meant as river crossing bridges. The rear ones were meant to be between buildings but several strung together make a great elevated monorail track.


Watch out for the scraps you cut out while making something. These were left over from the monorails. I slapped them on a base and now they're Imperial message boards. Some people like the Imperium and some people don't...


Now these are city walls! Constantinople had nothing on these bad boys!


But if you need something for a small fort or a compound, these'll work nicely, too.


This is one of my biggest pieces. This factory has a 15x15" footprint. It's foamcore with some plasticard on the doors and PVC pipes for tubes and smokestacks.


And lastly, you've seen these before. Who says you're restricted to blocky Imperial architecture?


So, I hope you got some ideas from this. when it comes to foamcore, you're pretty much limited by the thickness of the foamcore and your imagination (and maybe the size of your graph paper but you can buy that bigger!) so get out your pencils. Get drawing, get gluing and get cutting!

Saturday, July 11, 2009

Wall & Foamcore Tutorial 3

What did I make? Another wall! What are the odds? Actually, I have a couple more to build so don't be amazed when I present them in the next few days. But, then again, that's not all I did. I also continued with the foamcore tutorial.

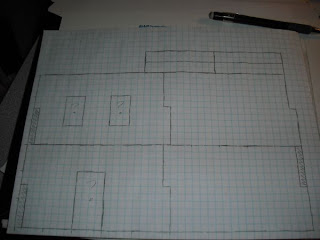
Yesterday I drew a simple building on graph paper. Normally I would have made photocopies of it but for our purposes today, I'm going to use the original drawn template itself. First you need your tools: a glue stick, a bottle of glue and an exacto knife. Once you have those out, we're ready to begin.

Take your glue stick and run it on the back of the template so you can stick it to the foamcore. If you want to be hardcore about it, a couple of days before you use it, open the glue stick and let it dry out. The glue in there is moist and when you put it on the paper, it will absorb into and warp the paper a bit. If you leave the glue stick open, excess moisture will evaporate giving you less chance of that happening. That's also why you want to photocopy the template. Copy paper is less absorbent than graph paper so you won't have to worry about it as much.

Adhere the glued template to the foamcore. Make sure it's flat and as even as possible. Notice how my sticking has ripples in it? That's because of moisture warping the graph paper as I mentioned before. Try to do the best you can but don't stress if there's a bubble or anything like that. Unless you're doing precision cuts or something like that, it won't really matter too much for out purposes.

This is when you get out the exacto knife and start cutting. Once again, try to stay with your lines the best you can, but don't stress if it isn't perfect. Foamcore is light enough and strong enough that even if you don't make a perfect line, the edges can still adhere well to things when gluing. Another thing that I'd take the time to mention is that if you plan on building a lot of buildings or big ones, you might consider buying a mat cutter. Even an inexpensive one will help with your straight lines and allow you to cut through board at angles if you want. If I had to start building again from the beginning, knowing what I know now, I would definitely invest in one. I also chose to cut out the door and windows. I recommend taking a little bit of scrap foamcore and gluing it behind the open sections. once you've finished and are ready, it's a little hard to paint the inside of the building. Besides, why waste the paint?

Once you've done the cutting, you'll be left with the various parts. Peel off the paper. A little might stick, but that's OK. it'll get painted over in the end so it won't hurt anything. It's a good time to double check and make sure everything is the proper size. I'll tell you a secret. When I drew this out, I miscounted one of the sides and made it a hair too long. It was an easy fix, but it's a perfect reason why you don't want to use your originals. If I still had it, I could erase and redraw a couple of lines and if would have been perfect for reproduction.

Note how these two building sides join together? That way, when I glue them, they'll be more stable since I''ll glue each join in two different places instead of one that could just snap. When I make taller buildings, I'll continue that up the side so they all fit together like teeth. Lots of extra stability makes for more durability...

Start gluing the joins and also the walls to the base. Usually if you glue two walls together and then to the base, it's easier to glue the other walls on. You may have to hold pieces in place for a minute but it should go together easily. And don't forget to glue the scrap foamcore to the door and windows! Glue the supports in the corners for the roof. They hold up the roof and, if you glue on three sides, give extra stability to the structure as a whole.

Make sure you finish everything you're going to do inside because now it's time to glue on the roof. Once you've done that, there's not getting back in there without doing some cutting. However, since it's just foamcore, if you make a mistake, turn it into a ruin or something and build another correctly. That's the great thing about foamcore buildings. if you mess them up, who cares? Make another!

Lastly, glue on the roof. It only takes a little bit on each support and letting it settle.

Voila! You new have a completed building. You may want to embellish it a little. A Plasticard logo could be cool. I like to take the bottom halves of plastic easter eggs and glue them on top for domes. Some bits glued on could make this a communication center or a temple or storage depot or whatever else you want. And of course, you can make buildings of almost any size and shape fore just about any function. Or you can go smaller, making barricades, bunkers and anything else you can think of. Heck, I'm even working out how to make vehicles and Rhinos out of foamcore so I can make wrecked vehicles for more terrain. The possibilities are almost endless. In fact, tomorrow, I'm going to show you some of the things I've made so you can see for yourself and maybe get some ideas.

Until then, good luck and good cutting!

Friday, July 10, 2009

Wall & Foamcore Tutorial Part 2

WallLast night I got another wall done. Nothing fancy. I have been noticing a minor problem with my last two walls, though. when foamcore sits around for a long time and isn't entirely flat, it will bow a little. Because of this, I'm having a harder time gluing things together because they're not entirely flush. No biggie, though. Once it's painted, you probably won't be able to tell it from any other wall.

Building TemplateSo let's make a foamcore building. The first thing you want to do is to pull out graph paper and draw it out. As you can see to the left, I have drawn out a simple intact square building that is 5x5x3". If you're starting with no buildings and want to make a lot of them, I recommend settling on a scale so that you can use multiple pieces and they look like they belong together. Or you can make each piece different. They're your buildings! I base almost everything I build on 5x5" and use 3" for each floor. If I had to start again from scratch, I might go to 6x6 or stay at 5x5 and use 2.5" per floor but I'm pretty happy with the scale I use currently for the most part. As you can see, each of the sides is the same and I've put in dovetails of a sort for stability when its assembled. You could totaly make them interlocking teeth but this is good for a simple building. Also remember that this is supposed to be in three dimensions so you have to account for the thickness of walls when you draw this out. That's easy with 4/inch graph paper. Just use a 1/4" (one grid block) to account for thickness since the foamcore will be 3/16" thick. Not quite the same, but certainly good enough for our purposes. I drew in a door and windows on a couple walls. You may or may not want to cut them out. Sometimes, I paint the doors or windows on. Often I cut them out and then glue a scrap piece of foamcore behind them so the depth is there. Paint black in the recessed area and it looks great. When you get into more complex buildings, you may want to think about places to slot things to add more stability or functionality but that's for later.

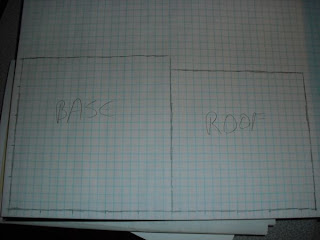
Base & RoofI also drew out a base and a roof. Note that the base is 5x5 but the roof is 4.5x4.5. the building is 5x5 but you have to account the the thickness of the wall so the roof is 4.5x4.5 to fit between the walls when they're glued together. And how will the roof stay up? Well, if you check out the previous page, I have some bars up there for roof supports. Glue them on the inside corners and then set the roof on top of them. If you want to be clever, you could cut out the doors and windows and cut a larger piece of foamcore that can cover the door and windows on the inside and can also support the roof. They're your buildings and you can do whatever you want with them.

Lastly, you probably want to go out and make photocopies of your templates for several reasons. If you like the building, you can use the same template over and over without redrawing it every time. If there's something wrong with the drawing and the building doesn't fit together, you can erase and redraw a couple of lines and the template is fixed. Of course, you use up a lot less graph paper that way. Lastly and more importantly, the actual paper in graph paper is weaker than standard copy paper which means it's more likely to tear or warp a little when you glue it to the foam core. Also it's less likely to peel off cleanly once you've done your cutting.

Now you've designed your first building. That's the hard part. Tomorrow you're going to put it on the foamcore and cut it out.

Thursday, July 9, 2009

Wall & A Foamcore Tutorial Begins

Bare WallThis is what I got done last night. What is it? It's a wall. It's three inches high and has a walkway on the back so that minis can stand on the wall and look or shoot out. Normally one can crank out several of these in an evening, but last night being...complicated, I was only able to manage one. It did get me thinking, though. Making things out of foamcore is really simple but I never did it until a few years ago, primarily because I thought I couldn't do it. But it's easy as all get out so I'm going to start a tutorial on making buildings and structures out of foamcore.

Desert BuildingsWhat is foamcore? Foamcore is a type of board that is created by gluing and pressing paper to the sides of thin sheets of polystyrene foam. The end result is a light, durable and strong board which can easily be cut or shaped. Most foamcore is white with white backing paper. It can be found with other colors of paper and, more recently, in black with black foam.

Desert WallsWhat do you need to start making buildings? Well first you need some foamcore. What kind of foamcore will be right for you? Well, good old white foamcore, in my humble opinion, is the best. Why? You can get it many places and sometimes cheaply. While you can find it at art stores and grocery stores, check out craft stores like Michael's and Hobby Lobby. They almost always have it cheapest and often have sales on it. Let's assume you're looking for a 20x30" sheet. At art stores, it tends to be a little expensive ($3-4 per sheet). Grocery stores will have better prices but still be a little high ($2-2.50). Craft stores will often have it cheapest ($1-1.50) and when they have sales you can get it by the arm load. Last time I picked some up was during a sale and I got it for 50 cents a sheet! Black foamcore is another good choice but for a different reason. It's very expensive ($5-6!) and only art or craft stores will have it. The big upside, however is that if your terrain gets damaged for some reason, it'll be harder to tell because the rip or tear will be black. You can pass it off as part of the design or construction. But if white foamcore gets damaged, there's this obvious white spot sticking out. If you're making something that will only get moderate use (you and your buddies), white is fine. If you're doing something more high traffic (club or store terrain) use black. Either way, start with white because mistakes are much cheaper... You'll need a few other things, too. Graph paper (4/inch), glue sticks, PVA or school glue, an exacto knife and a little bit of room will finish you out.

Over the next few posts, in addition to whatever I manage to accomplish normally, I'm going to walk designing, cutting and building a simple structure, give some tricks and ideas on how to embellish them and show some other buildings and structures you may want to consider. When we're done, you'll be able to make an entire world of terrain on your own!