Showing posts with label building. Show all posts

Tuesday, December 24, 2013

Honored Imperium Part 2

Well, I finished the statue and the little ruin.  I decided to go with the painted look for the statue, but I also decided not to go all the way painted, either.  I can totally imagine the zealots of the Imperium painting every square inch to make sure it's as "realistic" looking as possible, but I'm not one of those zealots.  That and leaving some of it actually looking like statuary reminds one that it is, in fact, a statue.  It was also pretty easy.  Broad areas not any super crazy detail.  On the whole, I'm good with it.

The Land Raider has not yet arrived.  I don't expect it until after Christmas.  Bit of a bummer, but it's better than not getting it at all.

I'm considering the idea of playing a mini game of 40K against myself to bone up on the current ruleset.  Maybe 500 points of Marines vs I don't know...  I have a Templar force that I can use as an OPFOR and do Marines on Marines, possibly using two different builds to get a feel how different units feel.  That's probably not a bad idea since I'm probably most likely to play against Marines, Chaos Marines, or any number of MEQ armies.  I think I'll try to slip it in sometime in the next week so I can actually say that I played a 6th ED game this year.

I've got a good handful of Tac Squad Jobbers started but not done.  I think those are going to be the next thing I work on.  I should also finish my Fortress of Redemption and maybe even start on my Shrine of the Aquila.  Or my 30-something Terminators.  Or my unpainted Vindicators.  Or unpainted Predators.  I've got too much stuff undone.  So let's not get ahead of ourselves.  Let's just go one step at  a time and, you know, get some stuff done while I have the time.

Thursday, December 19, 2013

Honored Imperium Part 1

Holy mother of crap!  You guys forgot I existed, right?  I guess there's a certain amount of irony that my third post of 2013 is almost at the end of 2013...  Now that life has opened up some more time, it's time to paint!

So last night, I based an Honored Imperium I had sitting around gathering dust.  Tonight, I painted the Broken Aquila.  I figured it gave me time to decide how I want to do the statue.  I've thought about good old fashioned gray stone, but I've also had another idea.  We know that most statues in antiquity weren't bare gray stone, but rather painted in bright colors to be eye catching.  I'm thinking about doing something similar: gray stone, but paint parts in bright colors to make it look as if it had been painted.  Maybe the shoulder pads and the shield and the blade?  The chest should definitely be gold.  I'll think about it.  I don't think I can get to it for a couple of days so I have time.

I do have one bit of awesome to report, though.  So I ended up in contact with a guy who plays Eldar, but somehow ended up with a MKI Land Raider.  So I'm trading him some Eldar stuff I've picked up (I'm working on an ally force, you know) that I don't want, namely some Dire Avengers (which I would like, but are worth trading) and a wraithlord (which I totally won't use!) and I'm going to throw in some Guardians, too.  What a bargain for me!  He's already posted it and I'll have his stuff off in a couple of days.  Doubleplus good!  I don't really field Land Raiders, but I can't not have one of those old beauties!

Get back to you in a couple of days...


Monday, April 19, 2010

The Project Continues: Desert Color

It's been a while, eh? A couple of weeks... Well, life sometimes gets in the way. And part of that life is sometimes not feeling the desire to paint. But the important thing is to get back to it when the urge hits.

I've spent so much time on the tower that I thought it was time to work on the rest of the structure. I want a desert look to the Fortress so that's what I went for. I drybrushed the decking with Boltgun, of course. I started the sides drybrushing on Codex Gray. I didn't like the look of any of the other GW browns (though, maybe I should have taken a look at Citadel Tausept Ochre) so I went out and got a bottle of Reaper Master Series Tanned Leather. Now that I've drybrushed that one, I'm not in love with the look. I think I'll highlight with something a little yellowish or maybe even Bleached Bone. That should do the trick.

For next time, I don't think I'm going to work on the Fortress. I think I'll work on some of the many minis waiting for some tender loving care. In the near future, I think I'm going to have another theme day. A long time back I had a Drednought day. I think soon I will have a Rhino Frame day. I've got at least two Rhinos and two Predators I have never assembled. I think it's time to get thos bad boys together. So what if I already have enough painted? When it comes to 40K, is there really such thing as enough?

Lastly, I'm looking forward to getting a couple Honored Imperium sets. Everybody bitches about the knees on the statue but you know what? They're supposed to be statues! Abstract and artistic representations of something! Not all statues are perfect and not all artists are good. So even with the wierd knees, looks good to me!

Friday, March 26, 2010

Shrine of the Aquila

Loyal readers, I am a weak man.

So when I photographed the parts of this last night, I couldn't help thinking about how I wanted to put it together. So I dropped everything and did it. What do you think? I didn't show pictures of the back. There are several walk ways and room to put minis behind the bottommost level wall under the balcony. Heck, it's as tall as the tower from the Fortress. I'm also thinking about adding a few buttresses and lamps on the front, but other than a few minor things, it's done.

There's no way I'm going to start painting this thing anytime soon. If I get to play with it, it's going to be bare plastic for a while. But when I do, it'll look sweet! Since this is a shrine to eh Undying Emperor or some kind of crap like that, I'm thinking white with gold details. Very striking! But I may change my mind by the time that comes around so we'll wait ad see on that one...

Thursday, March 25, 2010

Shrine of the Aquila and Sanctum

So I totally shouldn't have gotten this. Especially since I have the great project still looming. But I've wanted a Shrine of the Aquila for quite a while and when the opportunity came on EBay, I grabbed it. I also envisioned something more complex than just the big walls of the Shrine so I got the parts of a Sanctum, too. I'm going to put them all together to make one big Shrine! I'm envisioning a front made up of the broken sections of the Shrine with a large recessed balcony leading to the steps and door of the Shrine and the entire thing raised by the Sanctum as a lower level.

You know what? I'm so excited I think I'm going to go work on it now! I promise it won't stay me from the Fortress, but I've got to get this thing started!

Tuesday, March 23, 2010

The Project Continues: sides Two and Three

Nothing major to report. Last night, I got a little time to paint so I painted the cloaks of two more of the angels of death. Nothing stellar or amazing. Just a bunch of blue. I think I'll do their wings next because having three sides mostly done would make me feel much closer to getting done.

Heck, it occurred to me last night that even if I had time every night to paint, I'd still be working on this giant thing. All this time I've been working on the tower and that's it. Hopefully the rest of the Fortress will go much faster, but I'm prepared for this to take months. And, boy, will it look awesome when it's done!

Friday, March 19, 2010

The Project Continues: Wings

Once again, there has been a little bit of fear combined with a lack of time to paint. But I have overcome again!

I decided to get in there and do at least one set of wings so I have an idea how they will look. Simple formula: I painted on Ice Blue, brushed on some Space Wolf Gray and then highlighted with Skull White. I'm happy with how they came out, though I think I will ink the crevices a little. That's not going to come until a liter time, though. I'll finish all the wings on the other three sides before I do that, I think.

I'm also think that I'm going to re-do the halo. I should have undercoated the points with brown or yellow but I tried to paint directly on black and it just doesn't sit right with me. That should be a simple thing to fix. I could do that with a short amount of time. Maybe I'll get to it tomorrow, maybe not. Either way, now that I have one side mostly done, I'm feeling even better about the entire project.

I have one little secret to tell. I picked up a Shrine of the Aquila and most of a Sanctum on EBay. I shouldn't have and, to be honest, I messed up in my bidding and ended up paying a few dollars more than retail. On the other hand, I did get some extra floor tiles out of it all. Scant comfort, but it's better than nothing. When it arrives, I think it will make a lovely Imperial shrine...

Monday, March 15, 2010

The Project Continues: Painting the Fortress

And so it continues...

Tonight, I went on the three other sides and painted the sword and banner and painted part of the halos yellow. I also drybrushed the edge supports and riveted details with boltgun metal. I also decided to paint the knuckle bones with bleached bone. Still on the fence about the wings but I think I have decided to paint the superstructure tan, including the tower. That decision alone will ensure more progress is made, I think.

That's all, really. I think i might get a little more done tomorrow night. But we shall see...

Friday, March 12, 2010

Painting the Fortress

And so, it begins...

Last night I finally said "Enough!" and started painting the fortress. I decided to start with the decorative elements of the tower because that would give me more time to decide what colors I wanted to paint the fortress as a whole. As you can see, I went with Ultramarine Blue for the cloak, Ice Blue for the sash and Mithril Silver for the blade with a touch of Boltgun Metal for the hilt. A little white for highlights should show a little weathering and top it off well. Maybe a motto for the sash, too. Haven't decided on that yet. I might do the wings with Ice Blue and drybrush on Bleached Bone. I might check out how Fantasy players do Pegasus wings and sort of emulate that. Either way, I've got a little time. It'll be a few days before I get the other sides' cloaks, sashes and swords done.

As for the body, I'm leaning towards doing the supports in Boltgun and then doing the sides in some kind of tan like a desert motif. i may even do the non-angel parts of the tower that way, but I think I'll leave it alone. A black tower imposing over the day seems like the kind of imtimidating stuff the Imperium would build. And at night, the big colorful angel of death would be the only thing seen. Yeah, I think I'll leave the tower black...

Wednesday, March 10, 2010

Even More Fortress of Redemption

Alright, I have to tell you all a secret. I have been pro- crastinating. It isn't an active thing, but I've known for days that I've been doing it. Over the weekend I was afraid it would rain but I was wrong and I totally got this bad boy sprayed. But since then I've been stalled. Why? because I'm still debating how I want to paint it and am a little reticent to start work until I know. This is bad because I could have started on the tower already because I totally know how I'm going to paint it: Ultra Blue for the cloak, silver sword blade, electric blue sash/banner, and wings drybrushed first white then electric blue and then a highlighted with bleached bone and more white. The big debate is how will I do the rest of it? I could go bright and use white walls and electric blue supports. I could go dark and use fortress gray walls and boltgun supports. Just last night, I started thinking about a desert motif with snakebite/bleached bone walls. I just don't quite know and I'm afraid I'll have a little buyer's remorse if I'm not happy with my choice. I guess the moral to this story is to man up, do something and quit dithering about the little stuff. Just do it! I know better than anyone that if I don't like it, I can always paint it again!

And that is my moral for all of you today. Don't think too hard about your paint job or you'll end up paralyzed like me. Paint! The worst that can happen is you have to strip it and paint it again!

Thursday, March 4, 2010

More Fortress of Redemption


Isn't it magnificent! It's more awesome than I expected! I can't wait to start painting this old boy!

But I'm going to have to. While I got the main structures completed last night, I didn't have time to get the extra bits done (the lascannons, heavy bolters and other little flourishes). If the weather reports hold as they are supposed to, tomorrow will start a weekend of cold with off and on wet and I'm not taking chances with this lovely building. Besides, it's not like I have a dearth of things to paint. I've got a Terminator squad and a Vanguard squad along with a Black Reach Tac squad sprayed and waiting for work. I could whip up more squads or the Rhinos I have sitting in parts. And then there are the squads and vehicles I still have in their boxes unopened.

Man, sometimes I think to myself "why don't I just say to heck with it and decide to make an entire Chapter?"...

Wednesday, March 3, 2010

Fortress of Redemption! WOOT!

I went out on my front steps to find a package waiting for me! It arrived a bit earlier than I expected. As you can imagine, I have set the Thunderfire Cannon aside for now. I wanted to get to work on this bad boy so badly, I almost couldn't wait! But wait I did until evening and got to work!

I will admit, even though I saw sprues at game stores and reviews on Youtube, I'm impressed at how detailed this thing is. And freakin' huge, too!

Last night, I only got the far bunker assembled. Tonight I will work on the smaller bunker and the tower. I should be done with assembly tomorrow night but with luck, I may have enough time to get the entire thing done. I hope so because tomorrow is supposed to be a lovely day outside and it would be a great time to spray paint this thing down. It's been so cold and crappy on and off for the last few weeks that I haven't really been able to spraypaint so I haven't been assembling too many things. Here's hoping that I can git' the proverbial "'er" done and quickly before the weather turns again!

Tuesday, August 4, 2009

Two Towers

Well, there they are , cleaned up and finished. Simple towers that can serve as simple bastions. I haven't set them up with walls yet to get a feel for them yet, but that's alright because I bet they'll look just fine. Tonight, time permitting, I may try to make one or two more.

I'm running into an interesting problem... So the friend of mine who plays Guard? He has decided he wants to make a house rule. He wants to play with bigger tables and add a turn to the game. Why? Well, why do you think? This is the same guy who said he wouldn't even play 40K again until he could field 6 Basilisks. Now he doesn't like the small size of the tables. To an extent I agree with him. 6'x4' isn't much. It undercuts mobility and vastly decreases the effectiveness of firepower (as if that was king as it is). However, I know him. All he wants is more time to use those ungodly ranges that few else can touch to undo his opponent with big guns. I foresee breaking my own personal feelings and using all drop armies on him a few times to show the futility of that thinking. He wants to tilt the balance to favor himself winning when you should plan to do the best you can with what you have. Having mentioned this to him, he now seems to be more interested in Apocalypse which is cool because I like Apoc and I know he wants the bigger tables. However, when it comes to Apoc, he's fixated on titans and superheavies (which he can't afford and doesn't want to scratch build). And if it doesn't work out for him that way, he's taling about a 'Nid army made up of countless gaunts of all types. Jeez... I love the guy, but he's a total power gamer so playing him will be grating. But it will be playing with a friend So I guess I can live with that.

Monday, August 3, 2009

Two Towers

Well, I got two towers built and mostly painted. Tonight I'm going to do some touchup work and black in the windows and then these will be great bastions and wall towers. Definitely need at least two more but the standing plan is for three more anyway.

Was on Bell of Lost Souls forum while people were talking about the new Space Hulk. Someone mentioned that it would probably come out with more Terminators. Speaking as someone who has 40 Termies painted and another 35 basecoated or unassembled, do we really need more Terminators? I had to make the conscious choice not to get more when Black Reach ones were floating around like candy. I like Terminators, but I feel no need, either fluffwise or as a player, to have an entire Terminator Company. However, your proverbial mileage may vary. When I mentioned that, someone immediately jumped in to ask how much I wanted for the unassembled ones. Different strokes...

Sunday, August 2, 2009

Walls & Building Finally Complete

Finally finished up the touch ups on the walls and building. Took me long enough, eh? Now they get to join the pantheon of terrain I already have. Apparently my terrain collection has had an effect that I never originally intended.

You see, I started playing 40k with 3rd Edition. Several of my friends played 2nd Ed and Rogue Trader back in the day and I got a little taste of interest from those (I'll tell you one day about my first attempt at painting, remembered fondly as the "terra-cotta Marine") but what they were playing just didn't do it for me. I didn't like the idea of a tactical war game where one character or one vehicle could literally rule the field by taking on the entire opposing army alone. And that was a good description of those days. Imagine a character with enough war gear to outfit an entire army, multiple wounds and 3 to 5 saves, all of which are rolled when damage is incoming, dealing 10 attacks with power weapons, finger lasers and whatever other kind of craziness could be packed on. Believe me, you couldn't even kill a Land Raider back then. Every new unit was power cranked to be even more devastating. Remember when Warp Spiders used flamer templates and ignored armor saves? I do. :) Anyway, when 3rd Ed came out, they shifted the game away from characters and on to squads. And that's when I got into the game. That's also when those friends got out. A few weeks ago, we threw a little 4th of July soiree and one of them was over. When he saw all the terrain I've made, he was impressed. So much so that he's thinking about pulling out his Orks and playing again. This particular friend, though he hasn't played much in the last decade has still collected minis off and onin that time. He has Ork and Eldar armies that, if assembled and painted, would probably equal my Marine Army points wise. And another friend has been talking to me about getting back in and building a board in his garage and working on his old Guard army. I guess I've given them the bug again and I'm good with that.

This morning I put some templates on foam core for planned desert terrain, specifically two story buildings that I can use as bastions, wall towers or just stand alone generic buildings. With luck, I'll be able to cut them out and assemble them tonight, If I'm really lucky, I'll be able to paint them, but I wouldn't bet on that. Either way, we'll cross that bridge when we get to it.

Thursday, July 30, 2009

Walls & Building

Alright, I did the back sides of the walls last night. Now all I need is a little touch up, especially in corners, and they'll be good to go. While I was at it, I painted the building from the foamcore tutorial last night. Once again, I need to black in the windows and door and it'll be done.

Not too much to report other than that. I've been thinking about a terrain piece using a couple of those slimfast cans I acquired a number of years ago and still haven't used. They would be another addition to my one-day-to-be-accomplished industrial tank farm that I've been considering for years. Of course, this is just a side project that I don't feel pressure on since it's been rattling around for about 5 years and I've only built one piece... That doesn't mean I shouldn't pick up a few more small coffee cans, just in case.

Monday, July 13, 2009

Some Things I've Done With Foamcore

So, I've been talking about all this stuff you can build with foam core. Well, it's time to show you some of the things I've done. Maybe you'll get inspired!

Desert buildings. Note the one at the far right front. That's basically the basic building we built last time with the bottom of a plastic easter egg on top.


Similar buildings with an industrial look. The little factory in front is just foamcore with a couple of short PVC pipe fittings.


Desert ruins... Note that their bases are L-shaped. That way I can fit them together to make bigger building footprints...


Of course, wall rubble makes great barricades and can represent even more demolished buildings.


Talking about Planetstrike, does that look like it could be a Skyshield landing pad to you? It's a whole lot cheaper...


And maybe those could be defensive walls around a bunker. How many foamcore defensive lines do you think you can get out of $20 worth of foamcore?


These are bridges. Some are meant as river crossing bridges. The rear ones were meant to be between buildings but several strung together make a great elevated monorail track.


Watch out for the scraps you cut out while making something. These were left over from the monorails. I slapped them on a base and now they're Imperial message boards. Some people like the Imperium and some people don't...


Now these are city walls! Constantinople had nothing on these bad boys!


But if you need something for a small fort or a compound, these'll work nicely, too.


This is one of my biggest pieces. This factory has a 15x15" footprint. It's foamcore with some plasticard on the doors and PVC pipes for tubes and smokestacks.


And lastly, you've seen these before. Who says you're restricted to blocky Imperial architecture?


So, I hope you got some ideas from this. when it comes to foamcore, you're pretty much limited by the thickness of the foamcore and your imagination (and maybe the size of your graph paper but you can buy that bigger!) so get out your pencils. Get drawing, get gluing and get cutting!

Saturday, July 11, 2009

Wall & Foamcore Tutorial 3

What did I make? Another wall! What are the odds? Actually, I have a couple more to build so don't be amazed when I present them in the next few days. But, then again, that's not all I did. I also continued with the foamcore tutorial.

Yesterday I drew a simple building on graph paper. Normally I would have made photocopies of it but for our purposes today, I'm going to use the original drawn template itself. First you need your tools: a glue stick, a bottle of glue and an exacto knife. Once you have those out, we're ready to begin.
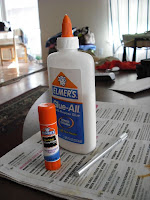
Take your glue stick and run it on the back of the template so you can stick it to the foamcore. If you want to be hardcore about it, a couple of days before you use it, open the glue stick and let it dry out. The glue in there is moist and when you put it on the paper, it will absorb into and warp the paper a bit. If you leave the glue stick open, excess moisture will evaporate giving you less chance of that happening. That's also why you want to photocopy the template. Copy paper is less absorbent than graph paper so you won't have to worry about it as much.
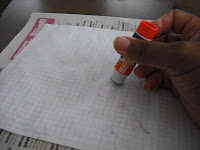
Adhere the glued template to the foamcore. Make sure it's flat and as even as possible. Notice how my sticking has ripples in it? That's because of moisture warping the graph paper as I mentioned before. Try to do the best you can but don't stress if there's a bubble or anything like that. Unless you're doing precision cuts or something like that, it won't really matter too much for out purposes.
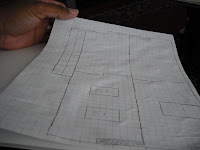
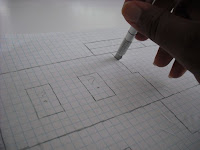
This is when you get out the exacto knife and start cutting. Once again, try to stay with your lines the best you can, but don't stress if it isn't perfect. Foamcore is light enough and strong enough that even if you don't make a perfect line, the edges can still adhere well to things when gluing. Another thing that I'd take the time to mention is that if you plan on building a lot of buildings or big ones, you might consider buying a mat cutter. Even an inexpensive one will help with your straight lines and allow you to cut through board at angles if you want. If I had to start building again from the beginning, knowing what I know now, I would definitely invest in one. I also chose to cut out the door and windows. I recommend taking a little bit of scrap foamcore and gluing it behind the open sections. once you've finished and are ready, it's a little hard to paint the inside of the building. Besides, why waste the paint?
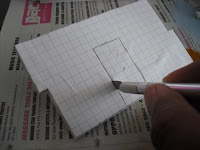
Once you've done the cutting, you'll be left with the various parts. Peel off the paper. A little might stick, but that's OK. it'll get painted over in the end so it won't hurt anything. It's a good time to double check and make sure everything is the proper size. I'll tell you a secret. When I drew this out, I miscounted one of the sides and made it a hair too long. It was an easy fix, but it's a perfect reason why you don't want to use your originals. If I still had it, I could erase and redraw a couple of lines and if would have been perfect for reproduction.

Note how these two building sides join together? That way, when I glue them, they'll be more stable since I''ll glue each join in two different places instead of one that could just snap. When I make taller buildings, I'll continue that up the side so they all fit together like teeth. Lots of extra stability makes for more durability...

Start gluing the joins and also the walls to the base. Usually if you glue two walls together and then to the base, it's easier to glue the other walls on. You may have to hold pieces in place for a minute but it should go together easily. And don't forget to glue the scrap foamcore to the door and windows! Glue the supports in the corners for the roof. They hold up the roof and, if you glue on three sides, give extra stability to the structure as a whole.
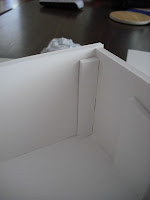
Make sure you finish everything you're going to do inside because now it's time to glue on the roof. Once you've done that, there's not getting back in there without doing some cutting. However, since it's just foamcore, if you make a mistake, turn it into a ruin or something and build another correctly. That's the great thing about foamcore buildings. if you mess them up, who cares? Make another!
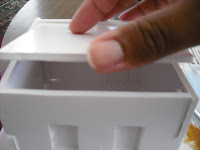
Lastly, glue on the roof. It only takes a little bit on each support and letting it settle.
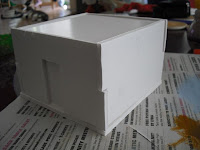
Voila! You new have a completed building. You may want to embellish it a little. A Plasticard logo could be cool. I like to take the bottom halves of plastic easter eggs and glue them on top for domes. Some bits glued on could make this a communication center or a temple or storage depot or whatever else you want. And of course, you can make buildings of almost any size and shape fore just about any function. Or you can go smaller, making barricades, bunkers and anything else you can think of. Heck, I'm even working out how to make vehicles and Rhinos out of foamcore so I can make wrecked vehicles for more terrain. The possibilities are almost endless. In fact, tomorrow, I'm going to show you some of the things I've made so you can see for yourself and maybe get some ideas.

Until then, good luck and good cutting!